Creating a clutter-free home can feel overwhelming, but with a well-planned decluttering strategy, you can turn your chaotic space into a calm and organized haven.
By breaking down the process into manageable tasks, you can work through each room in small increments, achieving a sense of accomplishment along the way. A clutter-free home is not just visually appealing; it can also improve your mental well-being and productivity.
Our comprehensive guide will walk you through the process, offering effective decluttering tips and a practical checklist to help you get started.
Key Takeaways
- Create a clutter-free home by breaking down tasks into manageable chunks
- Improve your mental well-being and productivity with an organized space
- Get started with our comprehensive decluttering checklist
- Work through each room in small increments for a sense of accomplishment
- Achieve a calm and peaceful living environment with our guide
Entryway Declutter

The entryway is the first impression visitors get of your home, making it a vital area to declutter. A clutter-free entryway sets the tone for the rest of your home, creating a welcoming atmosphere for residents and guests alike.
To start, let’s focus on removing unnecessary items and organizing what’s left. This process not only enhances the aesthetic appeal of your home but also improves functionality.
Shopping List
Before you begin decluttering your entryway, it’s helpful to have the right tools and storage solutions. Here’s a shopping list to consider:
- Hooks for coats and bags
- A bench or storage ottoman
- Baskets or bins for storing small items like keys and mail
- A shoe rack or organizer
- A console table or entryway organizer with drawers
Step-by-Step Instructions
Follow these steps to declutter your entryway effectively:
- Clear Everything Out: Start by removing all items from the entryway, including coats, shoes, and accessories
MyHomeStyleBlog.com is a participant in the Amazon Services LLC Associates Program, an affiliate advertising program designed to provide a means for sites to earn advertising fees by advertising and linking to Amazon.com. As an Amazon Associate, I earn from qualifying purchases.
. Sort items into categories to decide what to keep, donate, or discard. - Sort and Purge: Go through each category and remove anything that’s unnecessary or doesn’t belong in the entryway. Be ruthless – if you haven’t used it in the past year, it’s likely safe to get rid of it.
- Organize What’s Left: Use your shopping list items to organize the remaining clutter. Assign a home to each item to ensure it’s easily accessible.
- Maintain the Space: To keep your entryway clutter-free, establish a routine of putting away items after use and regularly tidying up.
By following these steps and using the proper storage solutions, you can create an entryway that’s not only clutter-free but also functional and inviting.
Coat Closet Cleanout

The coat closet is often one of the most neglected areas in our homes, but with a little effort, it can become a model of organization. A clutter-free coat closet not only makes your daily routine smoother but also contributes to a more minimalist living environment. By implementing a few simple strategies, you can transform this space into a serene and functional area.
Shopping List
To start your coat closet cleanout, you’ll need a few essential supplies. These include:
Having these items on hand will make it easier to categorize and store your belongings effectively.
Step-by-Step Guide
Follow these steps to achieve a well-organized coat closet:
- Remove Everything: Start by taking out all items from your coat closet. This will give you a clear view of what you have.
- Sort and Purge: Separate items into categories (coats, hats, scarves, etc.). Discard or donate items that are no longer needed or helpful.
- Organize with Storage Solutions: Use storage bins for accessories
MyHomeStyleBlog.com is a participant in the Amazon Services LLC Associates Program, an affiliate advertising program designed to provide a means for sites to earn advertising fees by advertising and linking to Amazon.com. As an Amazon Associate, I earn from qualifying purchases.
like gloves and hats. Install hooks for coats and bags. Utilize dividers or baskets for additional storage. - Label Your Storage: Use a label maker to identify what’s stored in each bin or on each hook, making it easier to find what you need.
- Maintain Your Space: Schedule regular check-ins to ensure your coat closet remains organized and clutter-free.
By following this decluttering checklist, you’ll maintain a coat closet that is both functional and visually appealing, contributing to a more organized home.
Shoe Storage Reset

Effective shoe storage solutions are crucial for maintaining a tidy and peaceful living space. Cluttered shoes can make an entryway or closet look disorganized and feel chaotic. By implementing a shoe storage system, you can significantly enhance your home’s aesthetic and functionality.
A well-organized shoe storage area not only keeps your shoes in good condition but also makes your daily routine more efficient. Let’s explore how to achieve this with the right products and steps.
Shopping List
To reset your shoe storage, you’ll need a few essential items. Consider the following:
- Shoe Rack: A sturdy shoe rack that fits your space, whether it’s a compact rack for a few pairs or a larger one for an extensive collection.
- Over-the-Door Storage: Over-the-door shoe organizers are perfect for maximizing space without taking up floor or shelf area.
- Shoe Boxes or Containers: Clear shoe boxes or containers can help keep shoes dust-free and organized.
- Shoe Care Products: Include products like shoe polish, conditioners, or waterproofing sprays to maintain your shoes.
Step-by-Step Instructions
Follow these steps to reset your shoe storage:
- Purge and Categorize: Start by removing all shoes from your storage area. Sort them into categories (e.g., by type, occasion, or season). Discard or donate worn-out or no longer needed shoes.
- Clean the Storage Area: Dust and vacuum the area where you’ll be storing your shoes. If using a shoe rack or new storage, assemble it according to the manufacturer’s instructions.
- Organize Shoes: Place shoes in your chosen storage solution. Use shoeboxes or other containers for less-frequently worn shoes, and keep daily or seasonal shoes accessible.
- Maintain the Space: Regularly clean and inspect your shoes. Establish the habit of putting shoes back in their designated places after use.
By following these steps and utilizing the right products, you can achieve a clutter-free shoe storage area that enhances your home’s overall organization and tranquility.
Living Room Surface Clear-Off

To achieve a calm living room, it’s essential to clear surfaces of unnecessary items. Clearing surfaces in the living room can make the space feel more relaxed and inviting. Remove unnecessary items and dust regularly to keep your home clutter-free.
Shopping List
To effectively clear off your living room surfaces, you’ll need a few essential items:
- A dusting cloth or microfiber cloth
- A tray or container for corralling small items
- A trash bag for disposing of unnecessary items
Clearing Your Living Room Surfaces
Follow these steps to clear your living room surfaces:
- Remove Unnecessary Items: Start by picking up any items that don’t belong on your living room surfaces, such as remote controls, books, or decorative items.
- Dust and Clean: Use a dusting cloth or microfiber cloth to dust all surfaces, including furniture and knick-knacks.
- Organize Remaining Items: Use a tray or container to corral small items like coasters, remotes, or candles.
- Maintain Your Space: Schedule regular dusting and cleaning sessions to keep your living room surfaces clutter-free.
TV Stand + Media Declutter

Achieving a minimalist living room starts with decluttering your TV stand and media area. A clutter-free TV stand not only enhances the aesthetic of your living room but also makes it easier to manage your media devices and accessories MyHomeStyleBlog.com is a participant in the Amazon Services LLC Associates Program, an affiliate advertising program designed to provide a means for sites to earn advertising fees by advertising and linking to Amazon.com. As an Amazon Associate, I earn from qualifying purchases.
Shopping List
Before you start decluttering, it’s helpful to have the right tools and supplies. Here’s a shopping list to get you started:
- Cable organizers
- Media console or TV stand with storage
- Label maker
- Storage bins for DVDs, gaming consoles, or other media accessories
Step-by-Step Guide to a Clutter-Free TV Stand
Follow these steps to declutter your TV stand and media area effectively:
- Remove everything from your TV stand and sort items into categories (e.g., cables, DVDs, gaming consoles).
- Clean the TV stand thoroughly before putting anything back.
- Use cable organizers to keep cables and wires tidy and untangled.
- Organize your media using storage bins or a media console. Consider digitizing your media collection to reduce physical clutter.
- Label your storage using a label maker to ensure everything has its designated place.
By following these steps, you can achieve a clutter-free TV stand that contributes to a more serene and organized living room. This not only enhances the visual appeal of your space but also makes it more functional and enjoyable.
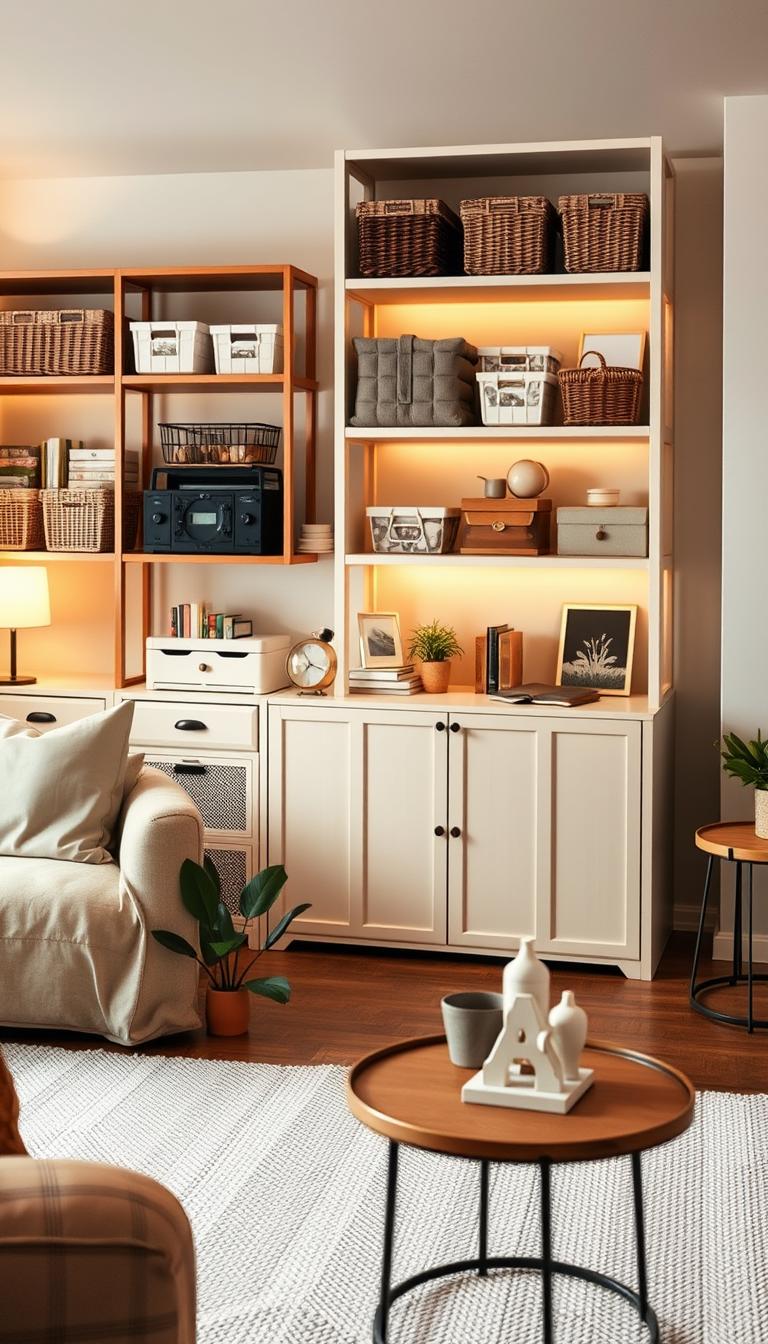
Bookshelves + Decor Simplifying

Creating a serene living space starts with simplifying your bookshelves and decor. Cluttered bookshelves can make a room look disorganized and chaotic. By streamlining your books and decorative items, you can achieve a calmer and inviting atmosphere.
Simplifying your bookshelves involves more than just removing books; it’s about creating a visually appealing display that reflects your personal style. Start by taking everything off the shelves. This gives you a clean slate to work with.
Shopping List
Before you begin simplifying, gather a few essential items:
- Decorative baskets
- Bookends
- Dust cloth
- Storage bins for items you want to keep but don’t need on display
Step-by-Step Instructions
Follow these steps to simplify your bookshelves and decor:
- Dust the shelves before you start rearranging to keep your books and decor dust-free.
- Sort your books into categories (e.g., fiction, nonfiction, reference) or by color to create a cohesive look.
- Remove any unnecessary or duplicate items. Consider donating books you no longer need or read.
- Use decorative baskets to store items like magazines, remote controls, or other small items that clutter your shelves.
- Arrange your decor thoughtfully. Use bookends to keep books upright, and space out decorative items to avoid clutter.
As a renowned interior designer,
“A well-organized bookshelf is not just about storing books; it’s about creating a visual narrative that tells a story about who you are.”
Simplifying your bookshelves and decor is not just about decluttering; it’s about curating a space that reflects your personality and style.
Kitchen Countertop Reset

The kitchen countertop is a critical area that requires regular decluttering to maintain a functional cooking space. A cluttered countertop can make meal preparation challenging and decrease the overall efficiency of your kitchen.
To reset your kitchen countertop, start by removing all items. This will give you a clear view of what you have and help you decide what to keep and what to store away.
Shopping List
Before you begin decluttering, gather a few essential items to make the task easier. Your shopping list should include:
- A tray or container to corral small items like spices or utensils
- Storage bins for storing less frequently used appliances
- A cleaning solution to wipe down the countertops after decluttering
- Organizers or dividers to keep items like knives or cooking utensils tidy
Step-by-Step Instructions
Follow these steps to achieve a clutter-free kitchen countertop:
- Sort Items: Categorize items into groups such as baking supplies, cooking utensils, and appliances. This will help you decide what to keep out and what to store.
- Purge Unnecessary Items: Be ruthless about getting rid of broken, redundant, or rarely used items. This will significantly reduce clutter.
- Assign a Home: Once you’ve purged your items, assign a home for each item you decide to keep. Use your tray or container to keep small items organized.
- Clean the Countertop: After removing all items, give your countertop a thorough clean. Use a suitable cleaning solution to remove any stains or grime.
- Maintain the Space: To keep your countertop clutter-free, establish a routine of putting away items after use and regularly reviewing what’s on your countertop.
By following these steps and maintaining your kitchen countertop regularly, you can achieve a more organized, efficient, and clutter-free kitchen. This not only enhances your cooking experience but also contributes to a calmer and welcoming home environment.
Fridge + Freezer Cleanout

Maintaining a clean and organized fridge and freezer not only enhances kitchen hygiene but also helps in reducing food waste. Regularly cleaning these appliances is crucial to ensuring your food remains safe to eat and that you’re not storing expired or spoiled items.
Shopping List
Before you start the cleanout process, ensure you have the right supplies. Here’s a list of what you’ll need:
- Trash bags
- A cleaning solution or a mixture of soap and warm water
- Baking soda
- White vinegar
- A scrubber or sponge
- Storage containers or bins for organization
Step-by-Step Instructions
Follow these steps to thoroughly clean out your fridge and freezer:
- Remove everything: Take out all contents from your fridge and freezer. This will give you a clear view of what you have and help you decide what to keep and what to discard.
- Sort items: Separate items into categories (e.g., expired, spoiled, to be consumed, and to be stored elsewhere). Be ruthless about getting rid of expired or spoiled food.
- Clean the appliances: Use your cleaning solution to wipe down the interiors of both the fridge and freezer. Remove any shelves or drawers and wash them with soap and warm water.
- Organize contents: Once everything is clean, start putting back only the items you decided to keep. Use storage containers or bins to organize similar items together and make the most of your space.
- Check expiration dates regularly: To maintain your newly organized fridge and freezer, make it a habit to check expiration dates periodically and clean out expired or spoiled food.
By following these steps, you’ll not only have a cleaner, more organized kitchen but also contribute to a safer, more efficient food storage system.
Pantry Declutter

Transforming your pantry into a well-organized space can revolutionize your cooking experience. A clutter-free pantry not only makes meal prep more efficient but also reduces stress and saves time. By implementing effective pantry organization strategies, you can create a more streamlined kitchen environment.
Shopping List
To start decluttering and organizing your pantry, you’ll need a few essential supplies. These include:
Step-by-Step Guide
Follow these step-by-step instructions to declutter and organize your pantry effectively:
- Clear Everything Out: Begin by removing all items from your pantry shelves. This will give you a clear view of what you’re working with.
- Sort and Purge: Sort items into categories (e.g., grains, canned goods, snacks). Discard expired or spoiled items.
- Clean the Pantry: Wipe down the pantry shelves and walls with a damp cloth. Vacuum or sweep the floor.
- Organize with Storage: Use storage bins and baskets to categorize and store items. Label each container for easy identification.
- Implement a Maintenance Routine: Schedule regular tidying sessions to keep your newly organized pantry in order.
By following these steps and utilizing the right supplies, you can achieve a well-organized pantry that enhances your overall kitchen experience. Effective pantry organization is a key aspect of home organization, contributing to a more efficient and enjoyable cooking environment.
Junk Drawer Clean Sweep

Let’s face it: the junk drawer can quickly become a dumping ground for miscellaneous items, but with a few simple steps, you can transform it into a tidy, functional space. The junk drawer is a common problem area in many kitchens, filled with everything from takeout menus to broken appliances. However, with a bit of effort, you can declutter this space and make it more organized.
Shopping List
Before you start decluttering, it’s a good idea to have the right tools on hand. Here’s a list of items you might need:
Step-by-Step Instructions
Now that you’re ready, let’s dive into decluttering and organizing your junk drawer.
- Empty the Drawer: Remove everything from the drawer. This will give you a clear view of what you’re dealing with.
- Sort Items: Separate items into categories, such as “keep,” “donate,” “recycle,” and “throw away.” Be ruthless – if you haven’t used it in the past year, it’s likely safe to get rid of it.
- Clean the Drawer: Once everything is removed, take a moment to clean the drawer. Dust and wipe it down to start fresh.
- Organize What’s Left: Use dividers or small baskets to organize the items you’ve decided to keep. Label each section to make it easy to find what you need.
- Maintain the Space: To keep your junk drawer organized, make it a habit to go through it every few months and remove anything that’s no longer needed.
By following these steps, you can turn your junk drawer into a model of efficiency and simplicity, creating a more streamlined, peaceful kitchen environment.
Under-Sink Kitchen Declutter

Under-sink clutter can be a significant issue in kitchen organization. The area under the sink can quickly become a jumbled mess of cleaning supplies, pipes, and other kitchen essentials. However, with the right strategies, you can transform this space into a tidy and functional area.
Effective under-sink organization is key to a clutter-free kitchen. By utilizing the proper storage solutions, you can maximize the space and keep your kitchen essentials within easy reach.
Shopping List
Before you start decluttering, it’s essential to have the right tools and supplies. Here’s a list of what you’ll need:
- Adjustable shelving units or baskets
- Slide-out drawer organizers
- Adhesive hooks or magnetic strips
- Step stool or ladder (if necessary)
- Trash bags
Step-by-Step Instructions
Follow these steps to declutter your under-sink area:
- Clear Everything Out: Start by removing all items from under the sink. This will give you a clear view of what you’re working with.
- Sort and Purge: Sort items into categories (e.g., cleaning supplies, kitchen gadgets). Discard any expired, broken, or unnecessary items.
- Clean the Area: Wipe down the under-sink area to remove any dirt, grime, or old adhesive.
- Organize with Storage Solutions: Use your chosen storage solutions to organize the remaining items. Install shelving units, use baskets, or implement slide-out drawers to maximize space.
- Put Everything Back: Once your storage solutions are in place, put back only the items you need or use regularly. Ensure that frequently used items are easily accessible.
As a Professional Organizer, Karen Whitley once said:
“The key to maintaining an organized space is to assign a home for each item.”
By doing so, you’ll not only achieve a clutter-free under-sink area but also make it easier to maintain over time.
By following these steps and utilizing the right storage solutions, you can achieve effective kitchen decluttering and enhance your overall home organization. A well-organized under-sink area contributes to a more streamlined and efficient kitchen, making meal preparation and cleanup a breeze.
Dish Cabinet + Glassware Edit

Editing your glassware and organizing your dish cabinet is a simple yet effective way to enhance your kitchen’s functionality. A well-organized dish cabinet not only makes your daily routines more efficient but also makes cooking and entertaining more enjoyable. As decluttering tips go, this is one of the most impactful for kitchen spaces.
“A cluttered kitchen is a sign of a cluttered life,” or so the saying goes. Simplifying your dish cabinet and glassware collection can have a profound effect on your overall kitchen experience. By implementing a few simple strategies, you can transform this often-overlooked area into a model of efficiency and elegance.
Shopping List
Before you start organizing, it’s essential to have the right tools. Here’s a list of items you might need:
- Adjustable dividers for your dish cabinet
- Stackable shelves for maximizing storage
- A dish rack for drying and storing dishes
- Glassware storage containers or a glassware cabinet
Step-by-Step Instructions
Now that you have your supplies, let’s dive into the process:
- Remove Everything: Start by taking out all dishes, glassware, and storage containers from your dish cabinet. This gives you a clear view of what you’re working with.
- Sort and Purge: Sort items into categories (e.g., plates, bowls, cups). Discard any items that are chipped, broken, or no longer needed. This is your chance to edit your glassware and dishes, keeping only what brings you joy or serves a purpose.
- Organize with Dividers: Use adjustable dividers to create separate sections within your dish cabinet for different types of dishes. This makes it easier to find what you need.
- Store Glassware Safely: For your glassware, consider using specific storage containers or a glassware cabinet to prevent breakage. You can also use dividers or separators within these storage solutions.
- Put Everything Back: Once you’ve purged and organized, it’s time to put everything back. Place your most frequently used items in easy-to-reach locations.
By following these steps and utilizing the proper storage solutions, you’ll be well on your way to a more organized kitchen. As the saying goes, “A place for everything, and everything in its place.” This dish cabinet organization project is a significant step towards a more streamlined and enjoyable cooking environment.
“The way we organize our kitchens can significantly impact our cooking experience and overall quality of life.”
Bedroom Nightstand Refresh

A clutter-free nightstand is key to a restful night’s sleep and a more organized bedroom. By simplifying this often-overlooked area, you can significantly enhance your bedroom’s ambiance and functionality. As Marie Kondo once said, “The way we tidy up is a reflection of the way we live.” Let’s make your bedroom a serene sanctuary.
Essentials for a Nightstand Refresh
Before you start decluttering, gather a few essentials to make the process smoother. You’ll need:
- A trash bag
- A storage box or basket
- A dusting cloth
- A drawer organizer (if your nightstand has drawers)
Step-by-Step Nightstand Decluttering
Follow these steps to give your nightstand a refresh:
- Clear Everything Off: Start by removing everything from your nightstand. This gives you a clean slate to work with.
- Sort Items into Categories: Group items into categories like “keep,” “donate,” “throw away,” and “store elsewhere.”
- Dust and Clean: Use a dusting cloth to wipe down your nightstand, removing any dust or dirt.
- Organize What’s Left: Use your storage solutions to keep only the essentials organized and within reach.
- Maintain Your Nightstand: Make it a habit to regularly tidy up your nightstand to keep it clutter-free.
By following these simple steps, you can create a peaceful and functional bedroom environment that promotes better sleep and relaxation. As
“A cluttered space leads to a cluttered mind,”
so let’s keep your nightstand tidy and your mind at ease.
Bedroom Dresser Declutter

The bedroom dresser, often a hub for daily essentials, requires regular decluttering to maintain a serene environment. A cluttered dresser can lead to a disorganized bedroom, affecting your overall relaxation and sleep quality.
By decluttering your bedroom dresser, you can reduce stress and create a more peaceful living space. This process involves removing items that don’t belong and organizing your clothing using dividers.
Shopping List
To effectively declutter and organize your bedroom dresser, you’ll need a few essential items:
- Drawer dividers
- Storage bins
- A dusting cloth
- A sorting system (e.g., boxes or baskets for different types of clothing)
Step-by-Step Instructions
Follow these steps to declutter your bedroom dresser:
- Remove Everything: Start by taking everything out of your dresser drawers.
- Sort Items: Separate items into categories (e.g., tops, bottoms, socks, underwear).
- Purge Unwanted Items: Discard or donate items that are no longer needed or useful.
- Organize Remaining Items: Use dividers and storage bins to keep items tidy and accessible.
- Dust and Clean: Wipe down the dresser and its drawers before putting everything back.
By following these steps, you can achieve a decluttered and organized bedroom dresser, enhancing your bedroom’s overall ambiance.
Closet Wardrobe Edit

Transforming your closet into a serene and organized space is easier than you think. A cluttered closet can be overwhelming, but with a few simple steps, you can create a peaceful retreat that makes mornings more efficient.
Editing your wardrobe is a crucial part of this process. By paring down your clothes to only what you need and love, you’ll not only reduce clutter but also make it easier to find what you’re looking for. Consider adopting a capsule wardrobe approach, where you limit your clothing to a specific number of items that can be mixed and matched.
Shopping List
Before you start editing your wardrobe, it’s helpful to have the right tools and supplies on hand. Here’s a shopping list to get you started:
Step-by-Step Guide
Now that you’re prepared, let’s dive into the step-by-step process of editing your wardrobe and organizing your closet.
- Take Everything Out: Start by removing everything from your closet. This will give you a clear view of what you have.
- Sort and Purge: Sort items into categories (e.g., tops, bottoms, dresses). Go through each category and remove anything that’s stained, ill-fitting, or hasn’t been worn in the past year.
- Organize What’s Left: Use your storage bins, double rods, and shoe organizers to keep items off the floor and make the most of your closet space.
- Maintain Your Space: Schedule regular check-ins with your closet to ensure it remains organized and clutter-free.
By following these steps and maintaining your newly organized closet, you’ll enjoy a more streamlined morning routine and a sense of calm in your home.
Bathroom Countertop Reset
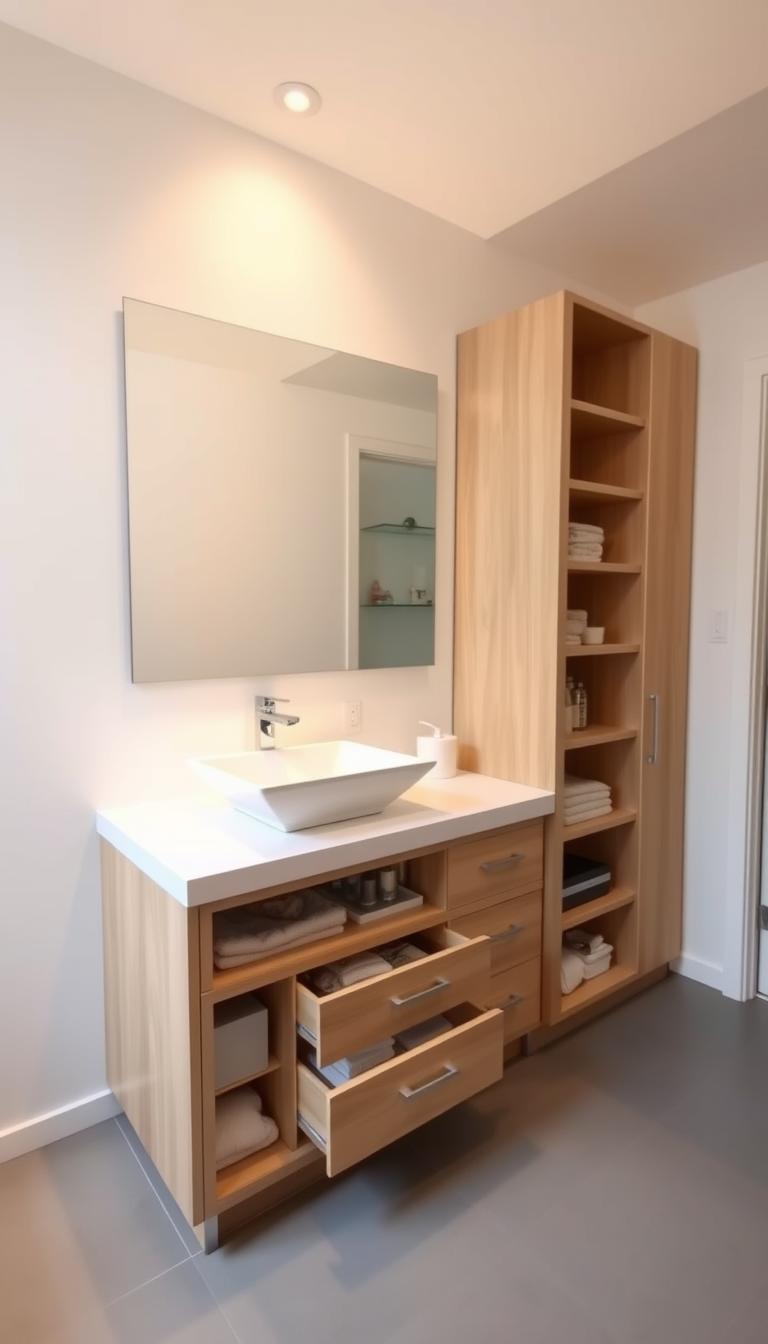
A clutter-free bathroom countertop is not just aesthetically pleasing; it also improves hygiene and makes your morning routine more efficient. Resetting this space can be a game-changer in your quest to simplify your space.
To start, remove all items from your bathroom countertop and sort them into categories. Be ruthless – if you haven’t used it in the past year, it’s likely safe to discard or donate it. Once you’ve purged your unwanted items, use a tray or container to corral small essentials like toiletries and jewelry MyHomeStyleBlog.com is a participant in the Amazon Services LLC Associates Program, an affiliate advertising program designed to provide a means for sites to earn advertising fees by advertising and linking to Amazon.com. As an Amazon Associate, I earn from qualifying purchases.
Step-by-Step Guide
- Remove everything from your bathroom countertop.
- Sort all items into categories such as skincare, haircare, makeup, and tools.
- Decide what to keep—discard or donate anything you haven’t used in the past year.
- Wipe down and clean the entire countertop surface.
- Place only your daily essentials back on the counter.
- Use a tray or small container to corral toiletries, jewelry
MyHomeStyleBlog.com is a participant in the Amazon Services LLC Associates Program, an affiliate advertising program designed to provide a means for sites to earn advertising fees by advertising and linking to Amazon.com. As an Amazon Associate, I earn from qualifying purchases.
, or frequently used items. - Store non-daily items in drawers, cabinets, or organizers to maintain a clutter-free look.
- Enjoy a cleaner, more hygienic, and efficient bathroom routine.
Shopping list
- Tray or small organizer
- Containers for sorting (optional)
- Cleaning wipes or spray
- Donation bag or box
Essential Items to Keep
When it comes to countertop declutter, it’s essential to strike a balance between functionality and minimalism. Consider keeping only your most-used items, such as your toothbrush holder, soap dispenser, and a small vase for fresh flowers.
By implementing these simple steps, you’ll keep your bathroom countertop clean and clutter-free, simplifying your space and enjoying a more relaxing bathroom experience.